Friday, April 25, 2014

Gather session Information.

Hi there,

I will not be original, not share inventions or hot insider information. But this trinket could save your time.
There is a very simple yet nice looking servlet to show you full HTTP session state. Believe me, sometime  it's not easy when developer tools in Chrome or *Fox will not tell you truth show you encoded data only.
Personally, I use that for debug and troubleshoot identity management configurations.
It would be useful for any Single Sign-On protected resources.  Right now I'm using it to validate identity federation authentications.

There is a screenshot:
OAM headers visible only from inside session.
I hardly name this minimalist JSP page with couple standard java classes an application but there is a source code.

<!DOCTYPE HTML PUBLIC "-//W3C//DTD HTML 4.01 Transitional//EN"
"http://www.w3.org/TR/html4/loose.dtd">
<%@ page contentType="text/html;charset=windows-1252"%>
<%@ page import="javax.servlet.http.Cookie" %>
<%@ page import="java.util.Map" %>
<%@ page import="java.util.Enumeration" %>

<html>
 
<head>
   
<meta http-equiv="Content-Type" content="text/html; charset=windows-1252"/>
   
<title>index</title>
   
<style type="text/css" >
        #thdr {
           
background-color: rgb(32,48,255);font-weight: 600;
           
color: white;
           
font-family: sans-serif;
        }
        #content {
           
width: 70%;
           
margin: 0 auto;
           
background-color: rgb(236,236,236);
        }
       
th {
           
text-align: left;
           
font-size: small;
           
font-family: sans-serif;
           
background-color: Silver;
            word-wrap:break-word
        }
       
td {font-size: small; word-wrap:break-word}
       
table {
            
border-spacing: 0px;
            
border-width: 0px;
            
width: 99.5%;
            
table-layout: fixed;
        }
       
body {
           
background-color: rgb(158,158,158);
        }
   
</style>
 
</head>
 
<body>
   
<div align="center" id="content">
     
<h2><strong>Session information </strong></h2>
   
<hr/>
   
<h4>Session Cookies</h4>
   
<% Cookie[] ccs = request.getCookies(); %>
   
<table id="CookieTbl" cellspacing="2" cellpadding="3" border="1" width="100%">
     
<tr ><th width="268" id="thdr">Name</th><th width="872" id="thdr">Value</th></tr>
    
<% for (int i=0;i<ccs.length;i++) {%>
     
<tr><th width="268"><%= ccs[i].getName()%></th><td width="872"><%=ccs[i].getValue()%></td></tr>
    
<% }%>
   
</table>
   
<p/>
   
<h4>Request Headers</h4>
   
<% Enumeration hdrs = request.getHeaderNames(); %>
   
<table id="RequestHdr" cellspacing="2" cellpadding="3" border="1" width="100%">
     
<tr id="thdr"><th width="268" id="thdr">Name</th><th width="872" id="thdr">Value</th></tr>
     
<% String hdr=null;
        
while(hdrs.hasMoreElements()){ hdr=hdrs.nextElement().toString();%>
         
<tr>
             
<th width="268"><%=hdr%></th>
             
<td width="872"><%= request.getHeader(hdr)%></td>
         
</tr>
     
<%}%>
   
</table>
   
<p/>
   
<h4>Request Parameters</h4>
   
<% Map<String,String[]> params = request.getParameterMap(); %>
   
<table id="RequestPrm" cellspacing="2" cellpadding="3" border="1"
          
width="100%">
     
<tr id="thdr"><th width="268" id="thdr" height="26">Name</th><th width="872" id="thdr"
                                                                      
height="26">Value</th></tr>
     
<% for (Map.Entry<String,String[]> param : params.entrySet()){ %>
     
<tr><th width="268" rowspan="<%=param.getValue().length%>">
         
<%= param.getKey()%></th>
         
<td width="872"><%= param.getValue()[0]%></td></tr>
         
<% for (int i=1;i<param.getValue().length;i++) {%>
             
<tr><td width="872"><%=param.getValue()[i]%></td></tr>
         
<%}%>
     
<%} %>
   
</table>
   
<hr/>
   
</div>
 
</body>
</html>
And if you use JDeveloper there is ready to project.

Save time for life and have a good weekend,

Sunday, March 23, 2014

Shared resource for demo SOA 11g Cluster

If you are going to build cluster configuration for Oracle SOA Suite 11g, you should provide shared disk drive for JMS persistence and other common resources. Official documentation recommends to use NFS resources. I can't explain why, but in our case access to NFS share was very unstable and totally unpredictable. Operating
system on cluster nodes eventually hangs and hadn't released resources. So we had to create test cluster without NFS shares and any NAS/SAN appliances.
We have three virtual machines, one is a Web tier with load balancer functionality and  the other two are SOA 11g cluster nodes.  Roles and links between servers you may see on the diagram below.

Let's assume that servers have follow names:

  • Web Tier - web
  • Cluster nodes - node1 and node2

Prepare block device

We should start from preparing block device to publish as iSCSI target. Unfortunately we haven't any free block devices on this server and there are no ways to add new drive or recreate partitions on existing system, so let's create block device from a regular file on an existing file system of web server.
  1. Create an empty file with neccessary size
    # dd if=/dev/zero of=/usr/shared-image bs=1M count=2048
At this  point we a ready to publish our device as shared storage.

Configure iSCSI target
For our cluster we use Oracle Enterprise Linux 5 Update 5 64. All services for our system was already installed, if you are going to use another linux distributive, you shoul check existence of services and packages. For example for RHEL 4U8 you have to install  OCFS22 packages and probably iscsi-target service.
  1. Enable iscsi-target service
    # chkconfig iscsi-target on
  2. Start service for the first time
    # service iscsi-target start
  3. Stop service
    # service iscsi-target stop
  4.  Edit file /etc/ietd.conf to add new device as follow
    # Example iscsi target configuration#
    # Everything until the first target definition belongs

    # to the global configuration.
    Target iqn.2011-08.demo.soa11:storage.soa.share.ocfs2       
    # Users, who can access this target. The same rules as for discovery
           
    # users apply here.
           
    # Leave them alone if you don't want to use authentication.
           
    #Incoming User joe secret
           
    #Outgoing User jim 12charpasswd
           
    # Logical Unit definition
           
    # You must define one logical unit at least.
    # Block devices, regular files, LVM, and RAID can be offered      
    # to the initiators as a block device.
           
    Lun 0 Path=/usr/shared-image,Type=fileio
           
    # Alias name for this target
           
    Alias WlsShare
           
    # various iSCSI parameters
           
    # (not all are used right now, see also iSCSI spec for details)
           
    #MaxConnections         1
           
    #InitialR2T             Yes
           
    #ImmediateData          No
           
    #MaxRecvDataSegmentLength 8192
           
    #MaxXmitDataSegmentLength 8192
           
    #MaxBurstLength         262144
           
    #FirstBurstLength       65536
           
    #DefaultTime2Wait       2
           
    #DefaultTime2Retain     20
           
    #MaxOutstandingR2T      8
           
    #DataPDUInOrder         Yes
           
    #DataSequenceInOrder    Yes
           
    #ErrorRecoveryLevel     0
           
    #HeaderDigest           CRC32C,None
           
    #DataDigest             CRC32C,None
           
    # various target parameters
           
    #Wthreads               8
  5. Start service again and publish our device to clients
    # service iscsi-target start

Connect iSCSI clients

A this point we are going to enable iSCSI services and attach published device. We shoud do this set of commands on both cluster nodes

  1. Add service iscsi to sartup sequence
    # chkconfig iscsi on
  2. Start service for the first time
    # service iscsi start
  3. Discover and attach published resouce on the web server (i.e. IP address  - 192.168.1.10)
    # iscsiadm -m discovery -t sendtargets -p 192.168.1.10
  4. Restart service to attach new device
    # service iscsi restart
  5. Check new drive availability
    # fdisk -l
Disk /dev/sda: 146.1 GB, 146163105792 bytes
255 heads, 63 sectors/track, 17769 cylinders
Units = cylinders of 16065 * 512 = 8225280 bytes

   Device Boot      Start         End      Blocks   Id  System
/dev/sda1   *           1          25      200781   83  Linux
/dev/sda2              26        2636    20972857+  83  Linux
/dev/sda3            2637        4725    16779892+  82  Linux swap / Solaris
/dev/sda4            4726       17769   104775930    5  Extended
/dev/sda5            4726       17769   104775898+  83  Linux

Disk /dev/sdb: 1073 MB, 1073741824 bytes
34 heads, 61 sectors/track, 1011 cylinders
Units = cylinders of 2074 * 512 = 1061888 bytes

We ca see new disk device on nodes without any partitions and file systems. 
Let's create new cluster file system. This operations we will do only on one server  (the second one should see file system)
  1. Connect to disk
    # fdisk /dev/sdb
    Command (m for help):n
      e   extended
      p   primary partition (1-4) p
    Partition number (1-4):1
  2. Make new partition from the first (1) sector to the last one and save the changes.
  3. Create file system on new partition
    # mkfs –t ocfs2 /dev/sdb1
When new filesystem will be created we can do next step and configure Oracle Cluster File System.

Configure OCFS2 cluster 
We are going to create new  OCFS2 cluster on servers node1 and node2.
We can edit ocfs2  configuration files in /etc/ directory, or we can use utility  ocfs2console.
Let's decide which servers have to have access to new shared resource. OCFS cluster is not related to any other clusters - SOA, Weblogic, RAC and any others. In general, OCFS Cluster is named list of hosts to share disk resource (-s) to create a new cluster let's use standard GUI tool - ocfs2console.
Form main menu select Cluster  then Configure Nodes. Add all participant nodes to  cluster members list. Save changes and select Cluster -> Propagate Configuration …If you have trusted relations between nodes OCFS configuraion will be copied to all members.
I use to set volume labels. It allows me to be device name agnostic (and Linux loves to change device names for some secret reasons). Use ocfs2console select menu Tools/Change Label … assign  partition label (SOA).
Now we are ready to mount our device on all nodes and enables OS auto mount during startup. You should repeat this steps on all OCFS cluster participants.
  1. Enable OCFS service :
    #/etc/init.d/o2cb enable
  2. Create mount point (obviously should be same on all resources)
    # mkdir /u01/share
  3. Add entry to file system list   /etc/fstab:
    LABEL=SOA               /u01/share              ocfs2   defaults        1 2
  4. Mount all devices by default:
    #mount  -a
    #mount
    /dev/sda2 on / type ext3 (rw)
    proc on /proc type proc (rw)
    sysfs on /sys type sysfs (rw)
    devpts on /dev/pts type devpts (rw,gid=5,mode=620)
    /dev/sda5 on /u01 type ext3 (rw)
    /dev/sda1 on /boot type ext3 (rw)
    tmpfs on /dev/shm type tmpfs (rw)
    none on /proc/sys/fs/binfmt_misc type binfmt_misc (rw)
    sunrpc on /var/lib/nfs/rpc_pipefs type rpc_pipefs (rw)
    none on /var/lib/xenstored type tmpfs (rw)
    configfs on /sys/kernel/config type configfs (rw)
    ocfs2_dlmfs on /dlm type ocfs2_dlmfs (rw)
    /dev/sdb1 on /u01/share type ocfs2 (rw,_netdev,heartbeat=local)
Regarding the last entry we have iSCSI drive mounted and accessible. Grant access to device for user oracle and group dba:
#chown –R oracle:dba /u01/share.
Now you have your simple shared disk system and could continue with SOA configuration.

Conclusion
Usng this approach you can create shared storage resources quick and simple with no additional costs. By the way I do not recommend to use this configuration outside POC systems or demo stands when you have to use 2 laptops to demonstrate SOA Suite in action.
In nova days I'd prefer to create several virtual boxes (ie under VMWare Server) and shared virtual drive with clustered file system (the same OCFS would work for you for free) 

This document was created several years ago in Russian so any comments, corrections are most welcome.

Sunday, January 20, 2013

Cloud Control 12c Corrective Actions


In our buggy development environment Weblogic management servers fails with OOM exception as leaves from the trees in the autumn. If we’ll forget for a while about the really best way – nice code, the second choice will be bounce management server and waiting for the next incident. Unfortunately in some cases you unable to stop those servers from console and kill OS process are the only option.

I do it automatically with a small process management trick and corrective actions, the really cool feature of Grid Control/Cloud Control.
I’m going to make some preliminary assumptions:

  • System runs on Linux/UNIX
Let’s start from very small OS script. It should do the very simple action:
  1. Find process id by managed server name
  2. Kill it with SIG_KILL level.
Why I’m going to use SIG_KILL? If you try to kill OS process with other levels Node Manager will consider that is the normal situation, and managed server will shut down, but with SIG_KILL Node Manager restarts managed server automatically. That is very suitable, because we shouldn’t do additional actions.

OS Script

I’ve written the very simple shell script to find and kill managed server process. It literally contains 3 commands:
#!/bin/sh
usr=`whoami`
plist=`ps -fu $usr |awk -v shl=$$ -v srv=$1 '$0~srv && $8~"java" {if ($3!=shl) print $2,$3}'`
kill $2 $plist

Script gets all current user processes. Then search process and parent process ids for process with substring passed as first parameter. The last step kills those processes with signal level passed as the second parameter.
Save this script to the file where it will be accessible for agent and give your group permission to execute it.

Actions Library

Now we should create corrective action in the actions library. It’s more about action templates then real actions, and later you will see it. To create new action, you should do the follow steps:
  1. Open Corrective Actions pages from Main Menu: Enterprise – Monitoring – Corrective Actions
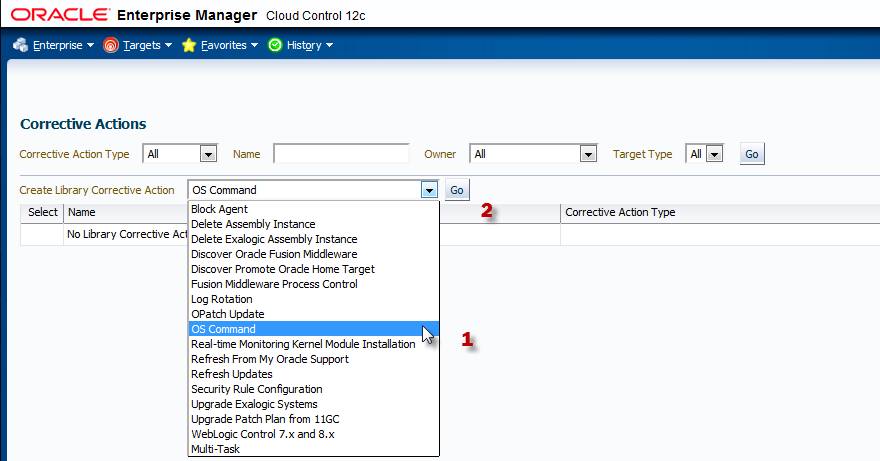
  2. Select OS Command from the drop down box in the row “Create Library Corrective Action” right above the table and press Go button.
  3. On General tab fill Action name, Description and select Target Type. The last one is very important because it defines will you action available for your targets and their metrics or not.
  4. Click on Parameters Tab
  5. Select Single operation as a Command Type and type the command in the Command field. For such small scripts there is “Script” option that allows you type all OS commands inside the action. There is pro and cons, but I prefer to use script files and call them as a single command.
  6. Cloud Control has a plenty amount of substitution variables. It allows us to use one action for every server that we are going to instrument. Full command line should looks like:
/home/oracle/bin/msfire.sh %ServerNames% -9

  1. Press Credentials tab. We can use preferred credentials for host (and it will be determined at runtime), you can define new credentials if you sure that they will be the same on every host or use one of existing pairs.  
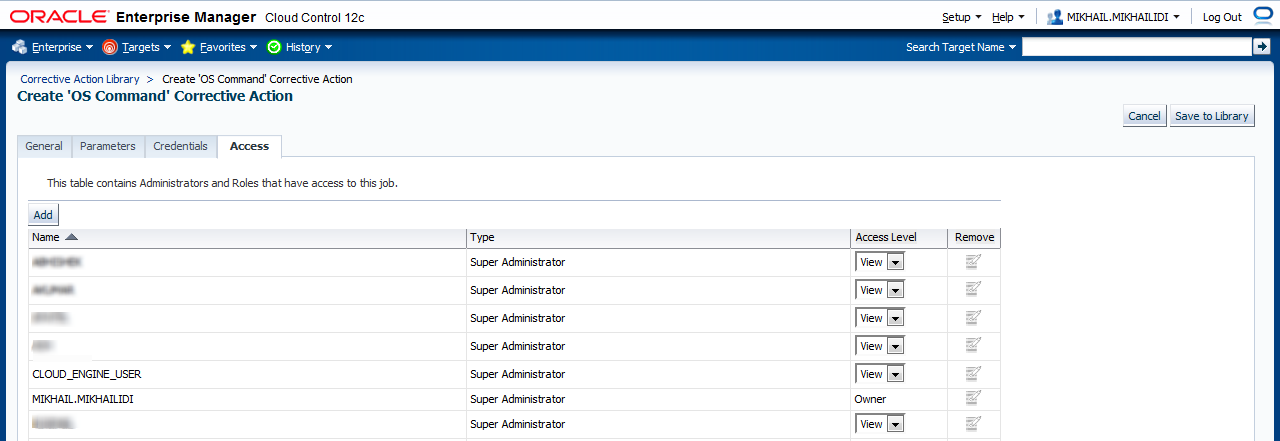
  2. The last tab is Access. You may define access level for other administrators or roles, defined in your system.
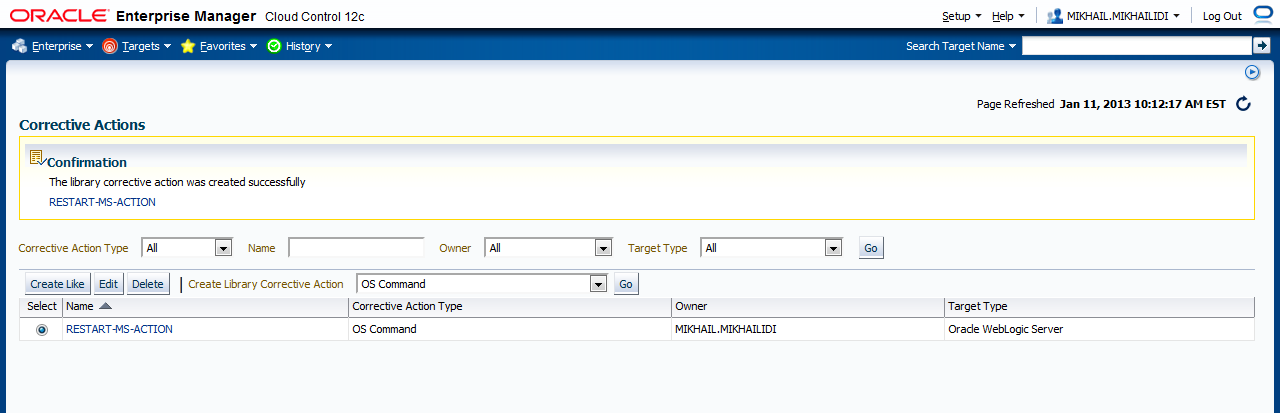
  3. When all parameters were set, press Save to Library button
  4. The new action will appears in the Corrective Actions list.
We are ready to apply new action to Weblogic servers

Metric and Collection Settings

We have issues with a couple of managed servers, so I’m not going to create or modify monitoring template. We just apply it for Weblogic server status metric. To do this, follow the steps below.
  1. Locate Weblogic Server and open Target Page. You may just type in server name in global Search field and press Enter. Then click on the target link
  2. From the Target Menu select Monitoring then Metric and Collection Settings
  3. Find Status metric in the Metrics table. Press on the blue pencil in  Edit column
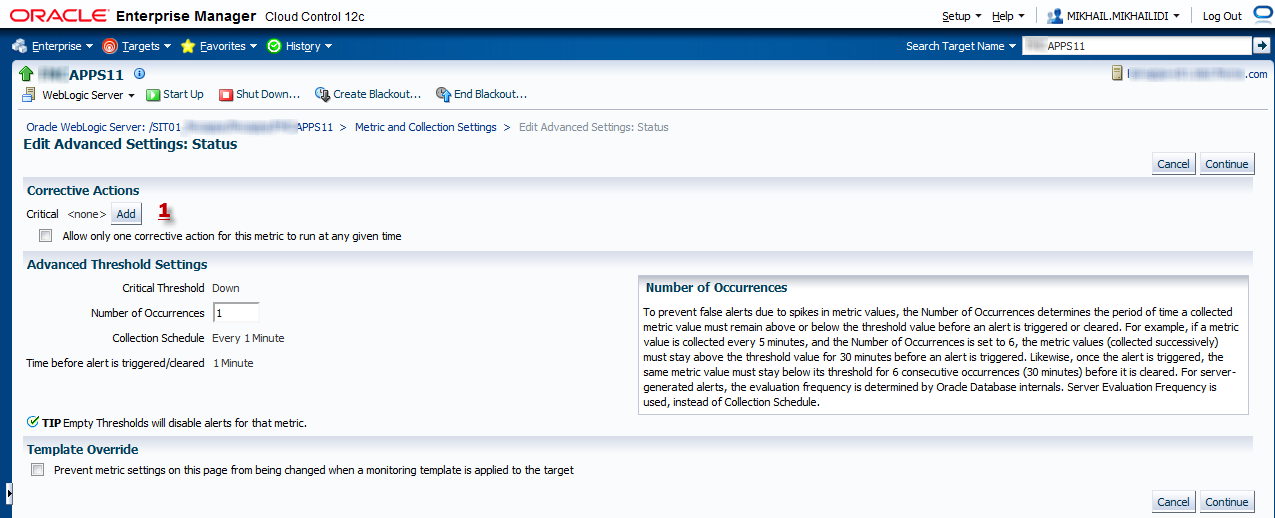
  4. In Advanced settings form click on Add button
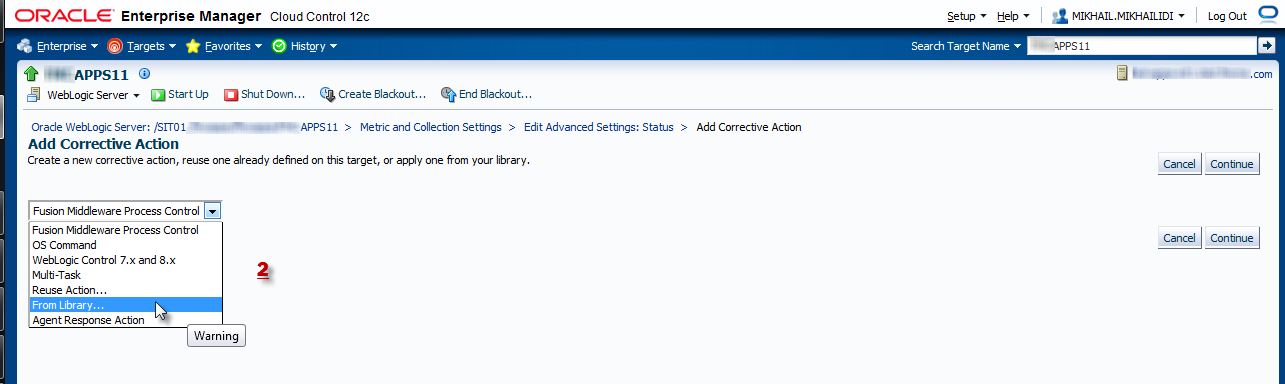
  5. In Add Corrective Action Form select “From Library …” option and click Continue button.
  6. Select Action that we created before and click Continue
  7. You will see exactly the same form as you seen during create action in the library. Type name for new corrective action on General tab.
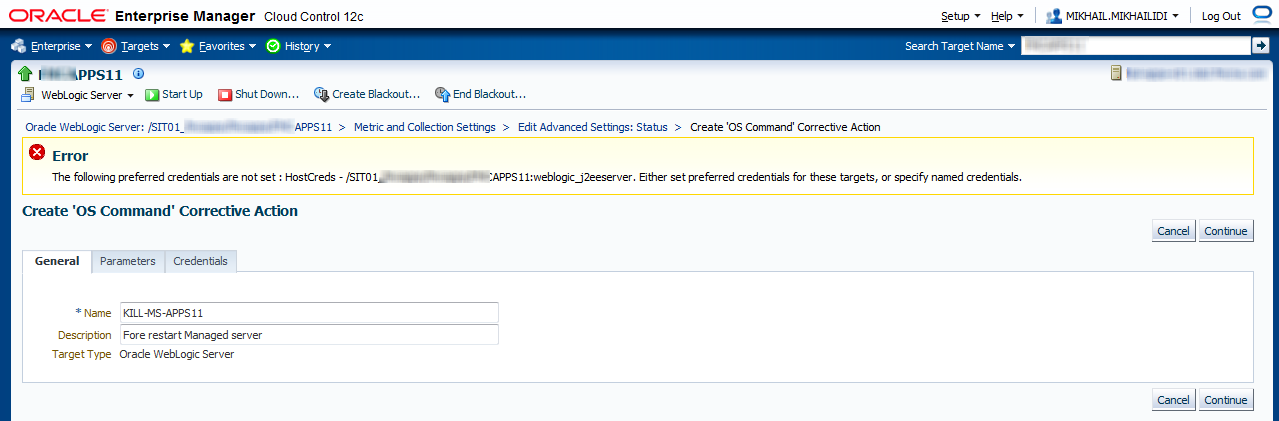
  8. Press Continue button. If your target has no preferred credentials you may receive error message as on screenshot below:
  9. On Credentials tab you may create new credentials pair or select one of named pairs.
  10. Click Continue button. You will be returned to Advanced Settings page. Check “Allow only one corrective action …”
  11. Click Continue button to save settings for Status metric.
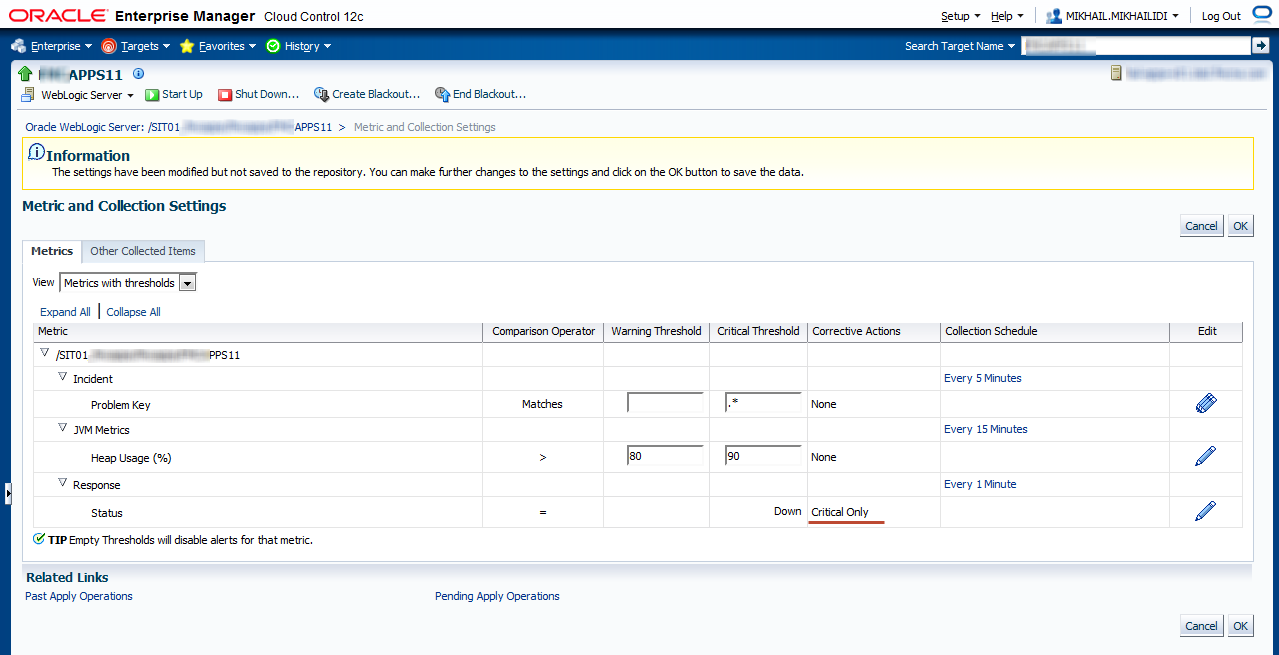
  12. In Metric and Collection Settings table you may see that Status row has a new status in Corrective Actions column.
  13. Press Ok to close Settings page.

Results

Now, anytime when Status metric will have critical value (in this case it means “Down”) Cloud Control will address this issue with corrective action. Let’s take a look to real incident and actions below.
Cloud Control Agent assumes that Weblogic server is down and notifies Cloud Control Server about.


Regarding Incidents Rules, Cloud Control notifies administrators (me for instance) AND run registered Corrective Action for this metric and you can see additional information on the Incident Details page.


Also you may check the execution steps and command output details.


Monday, January 14, 2013

OEM Cloud Control 12c registering stand-alone Oracle HTTP Server 10g

Oracle Enterprise Manager Agents unable to find all the information about the host software where are they were installed. It is still true even if we talk about Oracle Software. Practically we unable automatically take under control standalone Oracle HTTP Server (version 10.1.3.1/ Apache 2.0).
These servers are required for intermediate FMCNA Portal configuration, when applications would be already upgraded (Weblogic 11g/WebCache 11g) and Security Services aren’t (Oracle SSO 10g).
To register Oracle HTTP Server 10.1.3.X on Oracle Enterprise Manager Cloud Control 12c we should complete the follow tasks:

  1. Discover target host
  2. Deploy OEM CC Agent
  3. Add Oracle HTTP Server using Manual Configuration.
First two topics are standard procedures and covered by Oracle Enterprise Manager Documentation.
To register new Oracle HTTP Server 10.1.3.x complete the follow steps:
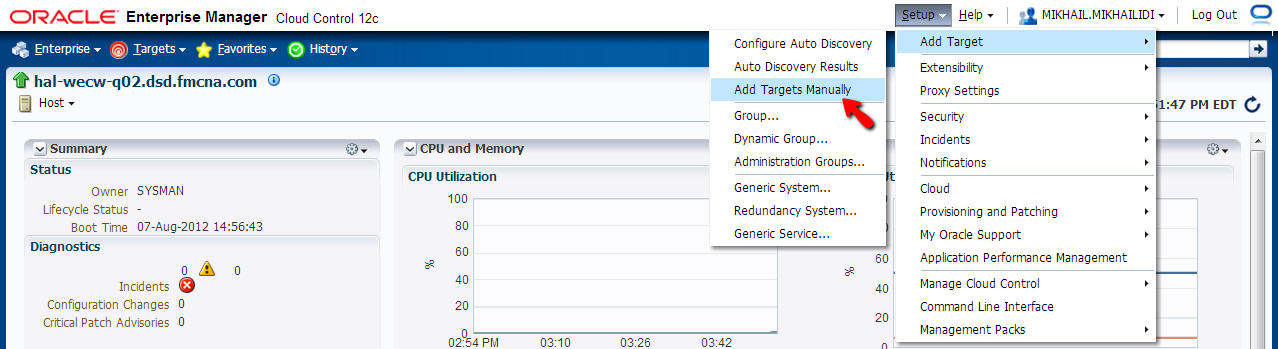
  1. From the Global Navigation Area select Setup -> Add  Target -> Add Targets Manually
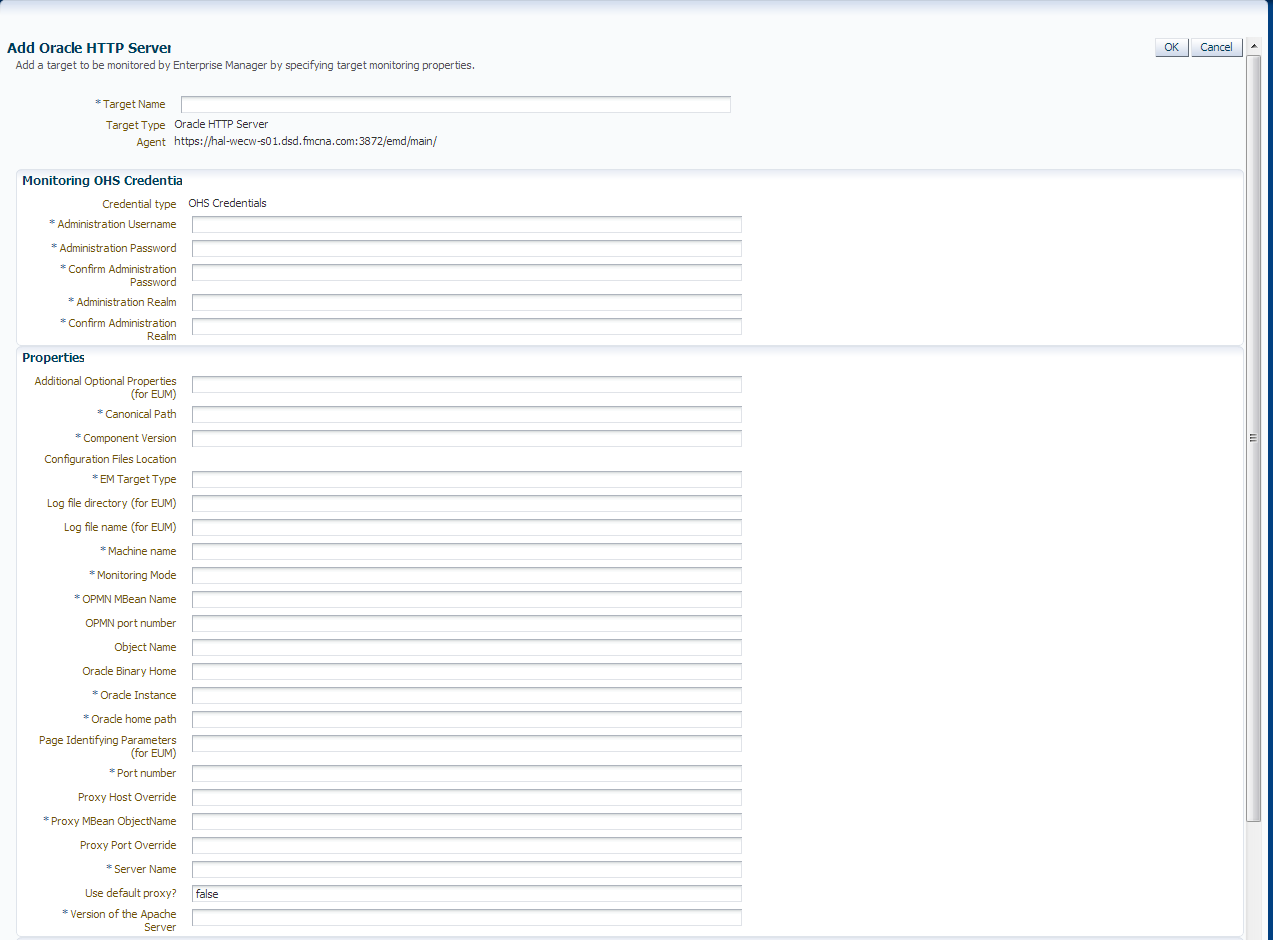
  2. Select  option “Add Non-Host Targets by Specifying Target Monitoring Properties” as on picture below.
  3. Select Target Type from the drop down list
  4. Lookup and select Monitoring Agent for corresponding component host using  button
  5. Press “Add Manually …” button
  6. On the next screen you will see a huge form with a lot of required fields.
  7. In our case not all of them are really necessary, so you could use any reasonable value to fill it out. I’ve used NA, Oracle Support recommends to use put ‘X’ char into it. The really matter fields are there:
    Field nameValueComment
    Target NameDisplay name for targetAny name except special characters
    EM Target Typeoracle_apacheOracle Support recommended value
    Machine namefull.server.name.comFully qualified host name
    Port Number7777Default Listen port for HTTP
    Version of Apache2.0Actual Apache server version for Standalone Oracle HTTP server 10.1.3.1 – 2.0
    Oracle Home Path/oraclewls/admin/ohsFull path to Oracle HTTP Server home dir
    OPMN Port Number7777Listen HTTP Port
    Version CategoryStdApacheOracle Support recommended value

    1. Fill all required fields with fake values of your choice.
    2. Fill out Global properties to describe target Location, Lifecycle and etc.
    3. Save the target parameters.
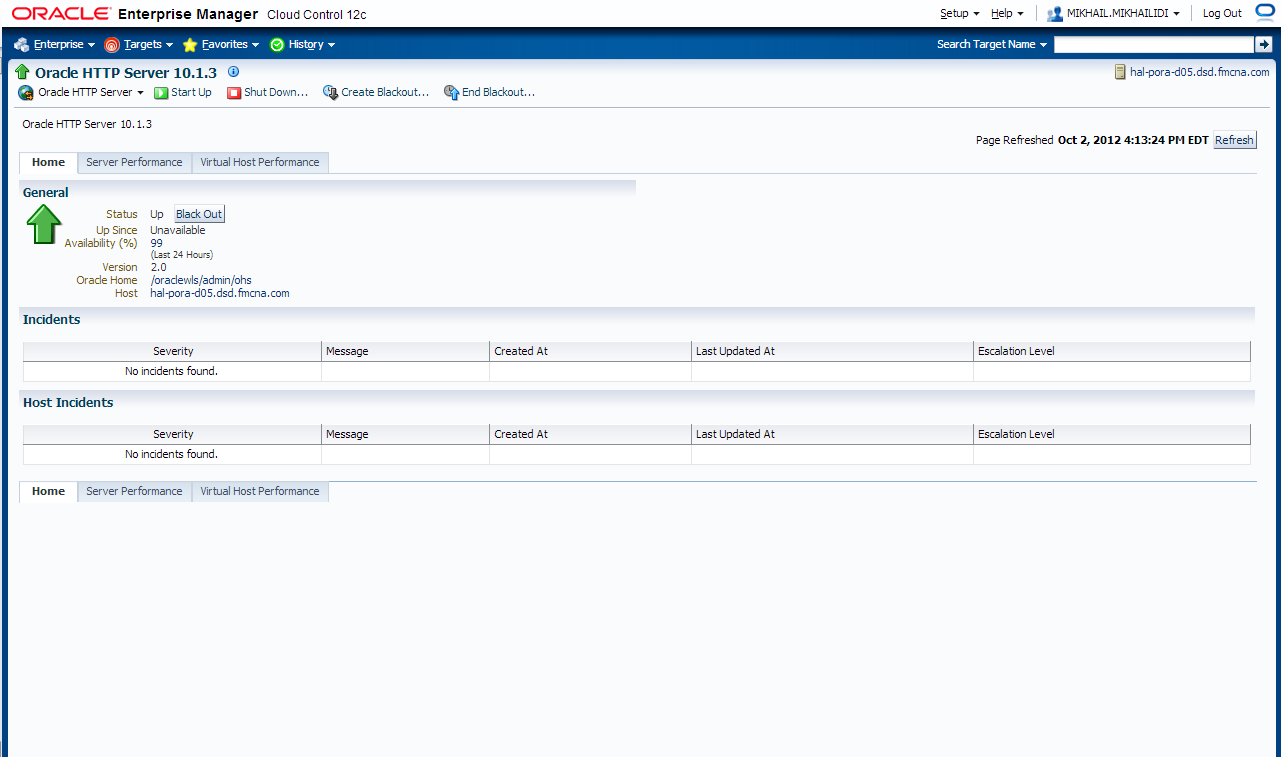
    4. If all was done right you will able to see target home as follow.

Therefore, you can only see the status of OHS . No performance related metrics, no control, no configuration changes. Thanks to Cloud Control developers there are great metric extensions functionality.